The Orocos Scripting Reference Manual
- Date
5 Jul 2011
Introduction
The OROCOS Scripting language allows users of the OROCOS system to write programs and state machines controlling the system in a user-friendly realtime script language. The advantage of scripting is that it is easily extendible and does not need recompilation of the main program.
General Scripting Concepts
Before starting to explain Program Syntax, it is necessary to explain some general concepts that are used throughout the program syntax.
Identifiers
Identifiers are names that the user can assign to variables, constants, aliases, labels. The same identifier can only be used once, except that for labels you can use an identifier that has already been used as a variable, constant or alias. However, this is generally a bad idea, and you shouldn’t do it.
Some words cannot be used as identifiers, because they are reserved by the OROCOS Scripting Framework, either for current use, or for future expansions. These are called keywords. The current list of reserved keywords is included here: alias, and, break, bool, char, catch, const, define, do, double, else, end, export, local, false, for, foreach, global, if, include, int, next, not, or, return, set, string, then, time, to, true, try, uint, until, var, while These, and all variations on the (upper- or lower-) case of each of the letters are reserved, and cannot be used as identifiers.
Expressions
Expressions are a general concept used throughout the Parser system. Expressions represent values that can be calculated at runtime (like a+b). They can be used as arguments to functions, conditions and whatmore. Expressions implicitly are of a certain type, and the Parser system does strong type-checking. Expressions can be constructed in various ways, that are described below…
Literals
Literal values of various types are supported: string, int, double, bool. Boolean literals are either the word “true” or the word “false”. Integer literals are normal, positive or negative integers. Double literals are C/C++ style double-precision floating point literals. The only difference is that in order for the Parser to be able to see the difference with integers, we require a dot to be present. String literals are surrounded by double quotes, and can contain all the normal C/C++ style escaped characters. Here are some examples:
// a string with some escaped letters:
"\"OROCOS rocks, \" my mother said..."
// a normal integer
-123
// a double literal
3.14159265358979
// and another one..
1.23e10
Constants, Variables and Aliases
Constants, variables and aliases allow you to work with data in an easier way. A constant is a name which is assigned a value at parse time, and keeps that value throughout the rest of the program. A variable gets its value assigned at runtime and can be changed at other places in the program. An alias does not carry a value, it is defined with an expression, for which it acts as an alias or an abbreviation during the rest of the program. All of them can always be used as expressions. Here is some code showing how to use them.
// define a variable of type int, called counter,
// and give it the initial value 0.
var int counter = 0
// add 1 to the counter variable
counter = counter + 1

// make the name "counterPlusOne" an alias for the
// expression counter + 1.  After this, using
// counterPlusOne is completely equivalent to writing
// counter + 1
alias int counterPlusOne = counter + 1
// you can assign an arbitrarily complex expression
// to an alias
alias int reallycomplexalias = ( ( counter + 8 ) / 3 )*robot.position

// define a constant of type double, with name "pi"
const double pi = 3.14159265358979
const double pi2 = 2*pi       // ok, pi2 is 6.28...
const int turn = counter * pi // warning ! turn will be 0 !

// define a constant at _parse-time_ !
const totalParams = table.getNbOfParams()
Variables, constants and aliases are defined for the following types: bool, int, double, string and array. The Orocos Typekit System allows any application or library to extend these types.
Strings and Arrays
For convenience, two variable size types have been added to the parser :
string and array. They are special because their contents have
variable size. For example a string can be empty or contain 10
characters. The same holds for an array, which contains doubles. String
and array are thus container types. They are mapped on std::string
and std::vector<double>. To access them safely from a task method or
command, you need to to pass them by const reference :
const std::string& s, const std::vector<double>& v.
Container types can be used in two ways : with a predefined capacity (ie the possibility to hold N items), or with a free capacity, where capacity is expanded as there is need for it. The former way is necessary for real-time programs, the latter can only be used in non real-time tasks, since it may cause a memory allocation when capacity limits are exceeded. The following table lists all available constructors:
Copy Syntax (copy done at run-time) |
Pre-allocate syntax (init done at parse-time) |
Notes |
|---|---|---|
var string x = string()
|
var string x
|
Creates an empty string. ( |
var string x = string("Hello World")
|
var string x("Hello World")
|
Creates a string with contents “Hello World”. |
var array x = array()
|
var array x
|
Creates an empty array. ( |
var array x = array(10)
|
var array x(10)
|
Creates an array with 10 elements, all equal to 0.0. |
var array x = array(10, 3.0)
|
var array x(10, 3.0)
|
Creates an array with 10 elements, all equal to 3.0. |
var array x = array(1.0, 2.0, 3.0)
|
var array x(1.0, 2.0, 3.0)
|
Creates an array with 3 elements: {1.0, 2.0, 3.0}. Any number of arguments may be given. |
Table: array and string constructors
// A free string and free array :
// applestring is expanded to contain 6 characters (non real-time)
var string applestring = "apples"

// values is expanded to contain 15 elements (non real-time)
var array  values      = array(15)

// A fixed string and fixed array :
var string fixstring(10)  // may contain a string of maximum 10 characters

fixstring  = applestring   // ok, enough capacity
fixstring  = "0123456789x" // allocates new memory (non real-time).


var array  fixvalues(10)  // fixvalues pre-allocated 10 elements
var array  morevalues(20) // arrays are initialised with n doubles of value 0.0

fixvalues  = morevalues  // will cause allocation in 'fixvalues'
morevalues = fixvalues   // ok, morevalues has enough capacity, now contains 10 doubles

fixvalues  = morevalues  // ok, since morevalues only contains 10 items.

values     = array(20)   // expand values to contain 20 doubles. (non real-time)

var array list(1.0, 2.0, 3.0, 4.0) // list contains {1.0, 2.0, 3.0, 4.0}
var array biglist;                 // creates an empty array
biglist = list           // 'biglist' is now equal to 'list' (non real-time)
var array example( 5 * numberOfItems )
The expression may not contain any program variables, these will all be zero upon parse time ! The following example is a common mistake also :
numberOfItems = 10
var array example( 5 * numberOfItems )
Which will not lead to ‘50’, but to ‘5 times the value of numberOfItems, being still zero, when the program is parsed.
Another property of container types is that you can index (use []) their contents. The index may be any expression that return an int.
// ... continued
// Set an item of a container :
for (var int i=0; i < 20; i = i+1)
     values[i] = 1.0*i

// Get an item of a container :
var double sum
for (var int i=0; i < 20; i = i+1)
     sum = sum + values[i]
If an assignment tries to set an item out of range, the assignment will fail, if you try to read an item out of range, the result will return 0.0, or for strings, the null character.
Operators
Expressions can be combined using the C-style operators that you are already familiar with if you have ever programmed in C, C++ or Java. Most operators are supported, except for the if-then-else operator (“a?b:c”) and the “++/–” post-/pre- increment operators. The precedence is the same as the one used in C, C++, Java and similar languages. In general all that you would expect, is present.
The ‘.’ Operator
When a data type is a C++ struct or class, it contains fields which you might want to access directly. These can be accessed for reading or writing by using a dot ‘.’ and the name of the field:
var mydata d1;

d1.count = 1;
d1.name  = "sample";
Some value types, like array and string, are containing read-only values or useful information about their size and capacity:
var string s1 = "abcdef"

// retrieve size and capacity of a string :
var int size = s1.size
var int cap  = s1.capacity
var array a1( 10 )
var array a2(20) = a1

// retrieve size and capacity of a array :
var int size = a2.size      // 10
var int cap  = a2.capacity  // 20
Parsing and Loading Programs
Before we go on describing the details of the programs syntax, we show how you can load a program in your Real-Time Task.
The easiest way is to use the DeploymentComponent where you can specify a script to load in the application’s deployment XML file or using the TaskBrowser. You can also do it in C++, as described below.
The example below is for a program script programs.ops which
contains a program with the name “progname”.
In the TaskBrowser
This is the easiest procedure. You need to tell the taskbrowser that you want the scripting service and then use the scripting service to load the program script:
Component [R]> .provide scripting
Trying to locate service 'scripting'...
Service 'scripting' loaded in Component
Component [R]> scripting.loadPrograms("programs.ops")
  = true
Component [R]> progname.start()
  = true
In C++ code
Parsing the program is done using the ‘getProvider’ function to call the scripting service’s functions:
#include <rtt/Activity.hpp>
#include <rtt/TaskContext.hpp>
#include <rtt/scripting/Scripting.hpp>

using namespace RTT;

RTT::TaskContext   tc;
tc.setActivity( new RTT::Activity(5, 0.01) );

// Watch Logger output for errors :
tc.getProvider<RTT::Scripting>("scripting")->loadPrograms("program.ops");

// start a program :
tc.getProvider<Scripting>("scripting")->startProgram("progname");
The Scripting service will load all programs and functions into ‘tc’.The program “progname” is then started. Programs can also be started from within other scripts.
In case you wish to have a pointer to a program script object
(RTT::scripting::ProgramInterface), you can have so only from within
the owner TaskContext by writing:
// Services are always accessed using a shared_ptr
// cast the "scripting" RTT::Service to an RTT::scripting::ScriptingService shared_ptr:
RTT::scripting::ScriptingService::shared_ptr ss
   = boost::dynamic_pointer_cast<RTT::scripting::ScriptingService>( this->provides()->getService("scripting") );

ProgramInterfacePtr p = ss->getProgram("progname");

// start a program :
p->start();
Orocos Program Scripts
Program Execution Semantics
An OROCOS program script is a list of statements, quite similar to a C program. Programs can call C/C++ functions and functions can be loaded into the system, such that other programs can call them. Program scripts are executed by the Execution Engine.
In general, program statements are executed immediately one after the other. However, when the program needs to wait for a result, the Execution Engine temporarily postpones program execution and will try again in the next execution period. This happens typically when yield was called. Calling operations and expressions on the other hand typically do not impose a yield, and thus are executed immediately after each other.
Program Syntax
program
A program is formed like this:
program progname {
  // an arbitrary number of statements
}
The statements are executed in order, starting at the first and following the logical execution path imposed by your program’s structure. If any of the statements causes a run-time error, the Program Processor will put the program in the error state and stop executing it. It is the task of other logic (like state machines, see below) to detect such failures.
Variables and Assignments
A variable is declared with the var keyword and can be changed using
the = symbol. It looks like this:
var int a, b, c;
a = 3 * (b = (5 * (c = 1))); // a = 15, b = 5, c = 1
The semicolon at the end of the line is optional, but when omitted, a newline must be used to indicate a new statement.
The if then else Statement
A Program script can contain if..then..else blocks, very similar to C syntax, except that the then word is mandatory and that the braces () can be omitted. For example:
var int x = 3

if x == 3 then  x = 4
else x = 5

// or :
if (x == 3) then {
  x = 4
  // ...
} else {
  x = 5
  // ...
}
It is thus possible to group statements. Each statement can be another if clause. An else is always referring to the last if, just like in C/C++. If you like, you can also write parentheses around the condition. The else statement is optional.
The for Statement
The for statement is almost equal to the C language. The first statement initialises a variable or is empty. The condition contains a boolean expression (use ‘true’ to simulate an empty condition). The second statement changes a variable or is empty.
// note the var when declaring i:
for ( var int i = 0; i != 10; i = i + 1 )
      log("Hello World")
// or group:
for ( i = 0; i < b; i = i + 1 ) {
      log("In the loop")
      // ...
}
Note that Orocos scripting does not (yet) support the postfix or prefix increment/decrement operators like ++ and –.
The while Statement
The while statement is another looping primitive in the Orocos script
language. A do statement is not implemented
var int i = 0;
while i < 10
    i = i +1
// or group:
i = 0;
while i < 10 {
    log("In while")
    i = i + 1
    // ...
}
As with the if statement, you can optionally put parentheses around the
condition i < 10. Note that Orocos scripting does not support the
postfix or prefix increment/decrement operators like ++ and --.
The break Statement
To break out of a while or for loop, the break statement is available. It will break out of the innermost loop, in case of nesting.
var int i = 0
while true  {
    i = i + 1
    if i == 50 then
        break
    // ...
}
It can be used likewise in a for loop.
Invoking Task Operations
Operations can be called like calling C functions. They take arguments and return a value immediately. They can be used in expressions or stand alone :
// var int arg1 = 3, arg2 = 4
// ignore the return value :
peer.method( arg1, arg2 )

// this will only work if the method returns a boolean :
if ( peer.method( arg1, arg2 ) ) {
      // ...
}

// use another method in an expression :
data = comp.getResult( arg1 ) * 20. / comp.value
These operations are executed directly one after the other.
Warning
A method throwing an exception, will cause a run-time program error. If this is not wanted, put ‘try’ in front of the method call statement, as shown in the next section.
Try … Catch statements
When a method throws a C++ exception, the program goes into an error state and waits for user intervention. This can be intercepted by using a try…catch statement. It tries to execute the method, and if it throws, the optional catch clause is executed :
// just try ignores the exception of action :
try comp.action( args )

// When an exception is thrown, execute the catch clause :
try comp.action( args ) catch {
    // statements...
}
If the method did not throw, the catch clause is not executed. Note that you can not inspect the C++ exception, so only rudimentary error handling is available.
Setting Task Attributes and Properties
Task attributes/Properties are set in the same way as ordinary script variables.
// Setting a property named MyProp of type double
var double d = 5.0
comp.MyProp = d
function
Statements can be grouped in functions. A function can only call another function which is earlier defined. Thus recursive function calling is not allowed in this language.
// A function only known in the current scripting service
void func_name( int arg1, double arg2 ) {
  // an arbitrary number of statements
}

// A function put in the interface of the component
export double func_name(bool arg) {
  // ...
  if ( arg ) then return +10.0; else return -10.0;
}

// A function put in the global service interface of the current process
global double global_func_name(bool arg) {
  // ...
  if ( arg ) then return +10.0; else return -10.0;
}
A function can have any number of arguments, which are passed by value, and may return a value.
By default, a function is only known in the scripting service of the current component. You can make this explicit by writing the local keyword in front of the return value. This function will be found as an operation in the ‘scripting’ Service of the current component. You should not rely on the presence or name of this Operation, since it is considered as ‘internal’ to the scripting Service. Future releases may relocate or rename this function.
You can add a function to the interface of the current component by using the export keyword. This allows you to extend the interface of a component at run-time.
Finally, the global keyword puts the defined function in the
RTT::internal::GlobalService, which makes it available for any
component or script in the current process.
You may redefine a function with the same name, in which case a warning will be logged and the new function is installed. In case the same function name is in use locally, at the TaskContext interface or globally, the local function is used first, then the TaskContext function and finally the global function.
Calling functions
A function can be called as a regular Operation :
foo(arg) // is a global, local or exported function of the current component
If one of the statements of the called function throws an exception, an exception is thrown in the current program and the calling program goes into the error state.
Note
The ‘call’ keyword has been deprecated since version 2.5 and should no longer be used.
return
The return statement behaves like in traditional languages. For programs and functions that do not return a value, the return statement is written like:
export void foo(int i) {
   // ...
   if ( i < 0 )
      return
   // use i...
}
When the return statement returns a value, it must be on the same line as the return word:
export int foo(int i) {
   // ...
   if ( i < 0 )
      return -1  // returned value on same line.
   // use i...
   return i*10
}
As the examples show, you can return from a function from multiple places.
Waiting : The ‘yield’ statement
A special statement ‘yield’ is provided. It temporarily suspends the execution of the current script and allows the Execution Engine in which it runs to do something else. You will need this in an endless while loop, for example:
while( true ) {
  log("Waiting...")
  yield
}
If the yield statement is omitted, the script would never return and consume all available processor time. Yield suspends the execution of this script until the ExecutionEngine is triggered again, for example, when an asynchronous operation is received or by the expiration of the period in a periodically running component.
Starting and Stopping Programs from scripts
Once a program is parsed and loaded into the Execution Engine, it can be manipulated from another script. This can be done through the programs subtask of the TaskContext in which the program was loaded. Assume that you loaded “progname” in task “ATask”, you can write
ATask.progname.start()
ATask.progname.pause()
ATask.progname.step()
ATask.progname.step()
ATask.progname.stop()
The first line starts a program. The second line pauses it. The next two lines executes one command each of the program (like stepping in a debugger). The last line stops the program fully (running or paused).
Some basic properties of the program can be inspected likewise :
var bool res =  ATask.progname.isRunning()
res = ATask.progname.inError()
res = ATask.progname.isPaused()
which all return a boolean indicating true or false.
Orocos State Descriptions : The Real-Time State Machine
Introduction
A RTT::scripting::StateMachine is the state machine used in the
OROCOS system. It contains a collection of states, and each state
defines a Program on entry of the state, when it is run and on exit. It
also defines all transitions to a next state. Like program scripts, a
StateMachine must be loaded in a Task’s Execution Engine.
StateMachine Mechanism
A StateMachine is composed of a set of states. A running StateMachine is always in exactly one of its states. One time per period, it checks whether it can transition from that state to another state, and if so makes that transition. By default, only one transition can be made in one Execution Engine step.
Besides a list of the possible transitions, every state also keeps
record of programs to be executed at certain occasions. There can be up
to four (all optional) programs in every state: the entry program (
which will be executed each time the state is entered ), the run
program ( which will be executed every time the state is the active
state ), the handle program ( which will be executed right after
run, if no transition succeeds ) and the exit program ( which
will be executed when the state is left).
There can be more than one StateMachine. They separately keep track of their own current state, etc.
A StateMachine can have any number of states. It needs to have exactly one “initial state”, which is the state that will be entered when the StateMachine is first activated. There is also exactly one final state, which is automatically entered when the StateMachine is stopped. This means that the transition from any state to the final state must always be meaningful.
A State Machine can run in two modes. They are the automatic mode and the reactive (also ‘event’ or ‘request’) mode. You can switch from one mode to another at run-time.
Reactive Mode: State Change Semantics
In order to enter the reactive mode, the State Machine must be ‘activated’. When active, two possible causes of state transitions can exist: because an event occured or because a transition was requested.
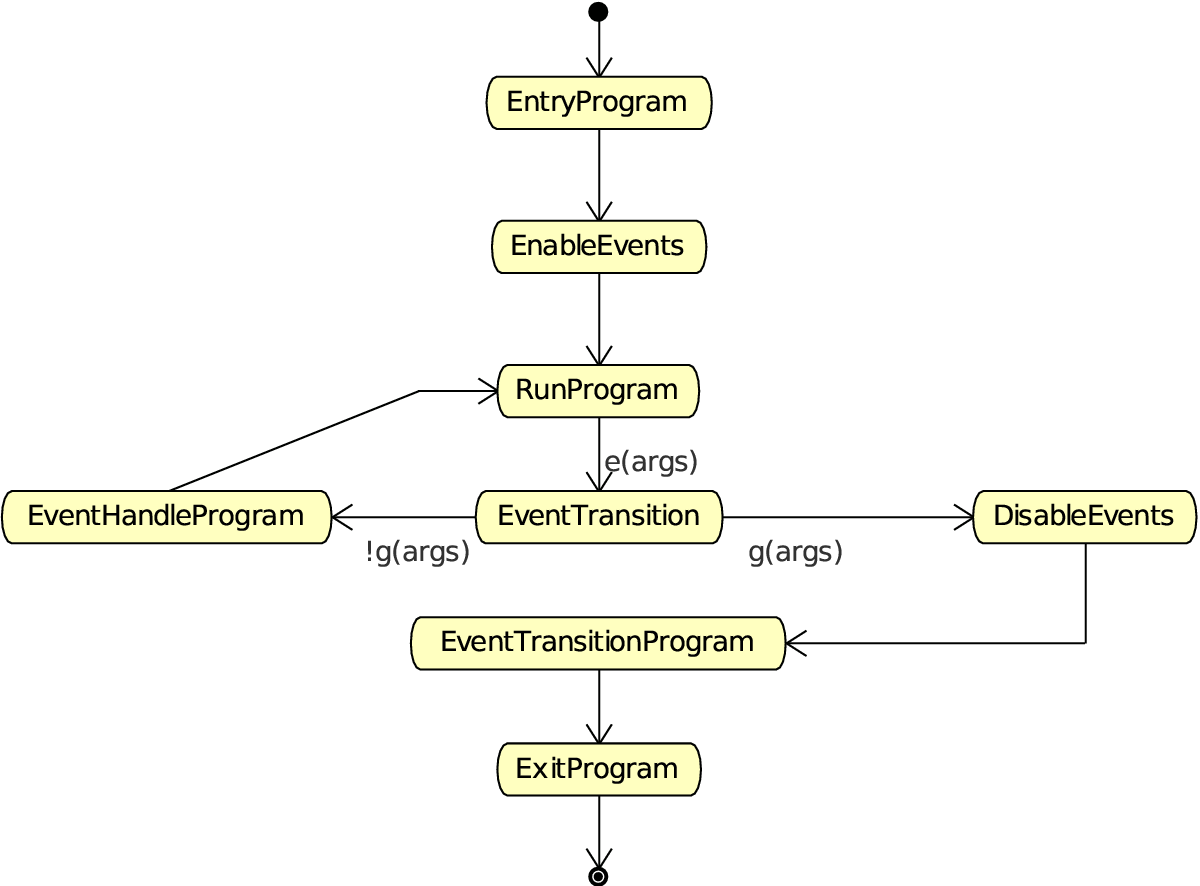
Fig. 13 State Change Semantics in Reactive Mode
A state can list to which Orocos data flow events it reacts, and under which conditions it will make a transition to another state. A state only reacts to events when its entry program is fully executed (done) and an event may be processed when the run program is executed, thus interrupt the run program. The first event that triggers a transition will ‘win’ and the state reacts to no more events, executes the event’s transition program, then the state’s exit program, and finally, the next state is entered and its entry program is executed. The next state now listens for events (if any) to make a transition or just executes its run program.
Another program can request a transition to a particular state as well. When the request arrives, the current state checks its transition conditions and evaluates if a transition to that state is allowed. These conditions are separately listed from the event transitions above. If a transition condition is valid, the exit program of the current state is called, the transition program and then the entry program of the requested state is called and the requested state’s run program is executed. If a transition to the current state was requested, only the run program of the current state is executed.
In this mode, it is also possible to request a single transition to the ‘best’ next state. All transition conditions are evaluated and the first one that succeeds makes a transition to the target state. This mechanism is similar to automatic mode below, but only one transition is made ( or if none, handle is executed ) and then, the state machine waits again. The step() command triggers this behaviour.
Automatic Mode: State Change Semantics
In order to enter automatic mode, the State Machine must be first reactive and then started with the start() command (see later on).
Note
This mechanism is in addition to ‘reactive’ mode. A state machine in automatic mode still reacts to events.
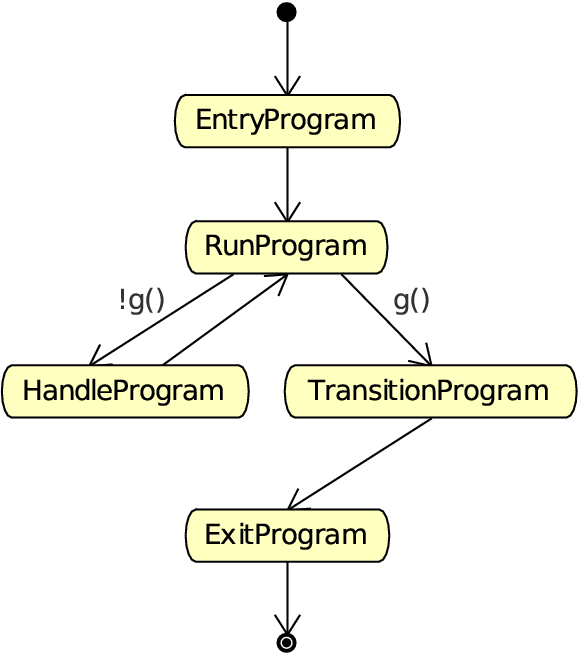
Fig. 14 State Change Semantics in Automatic Mode
In automatic mode, after the run program of the current state finishes, the transition table (to other states) of the current state is evaluated. If a transition succeeds, the transition program is executed, then the exit program of the current state is called and then the entry program of the next state is called. If no transition evaluated to true, the handle program (if any) of the current state is called. This goes on until the automatic mode is left, using the pause, stop or reactive command.
Parsing and Loading StateMachines
Analogous to the Program section, we first show how you can load a
StateMachine in your Real-Time Task. Assume that you have a StateMachine
“MachineInstanceName” in a file state-machine.osd.
In the TaskBrowser
This is the easiest procedure. You need to tell the taskbrowser that you want the scripting service and then use the scripting service to load the state machine
Component [R]> .provide scripting
Trying to locate service 'scripting'...
Service 'scripting' loaded in Component
Component [R]> scripting.loadStateMachines("state-machine.osd")
  = true
Component [R]> MachineInstanceName.activate()
  = true
Component [R]> MachineInstanceName.start()
  = true
In C++ code
Parsing the StateMachine is very analogous to parsing Programs in C++:
#include <rtt/Activity.hpp>
#include <rtt/TaskContext.hpp>
#include <rtt/scripting/Scripting.hpp>

using namespace RTT;

RTT::TaskContext   tc;
tc.setActivity( new RTT::Activity(5, 0.01) );

tc.getProvider<Scripting>("scripting")->loadStateMachines( "state-machine.osd" );

// activate a state machine :
tc.getProvider<RTT::Scripting>("scripting")->activateStateMachine("MachineInstanceName");
// start a state machine (automatic mode) :
tc.getProvider<Scripting>("scripting")->startStateMachine("MachineInstanceName");
The Scripting service loads all instantiated state machines in tc. StateMachines have a more complex lifetime than Programs. They need first to be activated, upon which they enter a fixed initial state. When they are started, they enter automatic mode and state transitions to other states can take place. StateMachines can also be manipulated from within other scripts.
In case you wish to have a pointer to a state machine script object
(RTT::scripting::StateMachine), you can have so only from within the
owner TaskContext by writing:
// Services are always accessed using a shared_ptr
// cast the "scripting" RTT::Service to an RTT::scripting::ScriptingService shared_ptr:
RTT::scripting::ScriptingService::shared_ptr ss
   = boost::dynamic_pointer_cast<RTT::scripting::ScriptingService>( this->provides()->getService("scripting") );

StateMachinePtr sm = ss->getStateMachine("MachineInstanceName");

// activate and start a StateMachine :
sm->activate();
sm->start();
Defining StateMachines
You can think of StateMachines somewhat like C++ classes. You first need to define a type of StateMachine, and you can then instantiate it any number of times afterwards. A StateMachine ( the type ) can have parameters, so every instantiation can work differently based on the parameters it got in its instantiation.
A StateMachine definition looks like this :
StateMachine MyStateMachineDefinition
{
  initial state myInit
  {
      // all these programs are optional and can be left out:
      entry {
      // entry program
  }
  run {
      // run program
  }
  handle {
      // handle program
  }
  exit {
      // exit program
  }
  // Ordered event based and conditional select statements
  transition ... { /* transition program */ } select ...
  transition ...

  }

  final state myExit {
  entry {
      // put everything in a safe state.
  }
  // leave out empty programs...

  transition ...
  }

  state Waiting {
      // ...
  }

  // ... repeat
}

// See  :
RootMachine MyStateMachineDefinition MachineInstanceName
A StateMachine definition: a StateMachine can have any number of states. It needs to have exactly one “initial state” ( which is the state that will be entered when the StateMachine is first started ). Within a state, any method is optional, and a state can even be defined empty.
The state Statement
A state machine can have an unlimited number of states. A state contains optionally 4 programs : entry, run, handle, exit. Any one of them is optional, and a state can even conceivably be defined empty.
The entry and exit Statements
When a state is entered for the first time, the entry program is executed. When it is left, the exit program is called. The execution semantics are identical to the program scripts above.
The run Statement
The run program serves to define which activity is done within the state. After the entry program finishes, the run program is immediately started. It may be interrupted by the events that state reacts to. In event mode, the run program is executed once (although it may use an infinite loop to repeatedly execute statements). In automatic mode, when the run program completes, and no transitions to another state can be made (see below) it is started again (in the next execution step).
The handle and transition Statement
When the run program finishes in automatic mode, the state evaluates its
transitions to other states. The handle program is called only when no
transition can be found to another state. The transitions section
defines one or more select state statements. These can be guarded
by if…then clauses (the transition conditions):
// In state XYZ :
// conditionally select the START state
transition if HMI.startPushed then {
      // (optional)
      // transition program: HMI.startPushed was true
      // when finished, go to START state
} select START

// next transition condition, with a transition failure program:
transition if HMI.waiting then
    select WAIT else {
      // (optional)
      // transition failure program: HMI.startPushed was false
}

handle {
   // only executed if no transition above could be made
   // if startPushed and waiting were false:
   // ...
}
The transitions are checked in the same order as listed. A transition is allowed to select the current state, but the exit and entry functions will not be called in that case. Even more, a transition to the current state is always considered valid and this can not be overridden.
State Preconditions
Often it’s useful to specify some preconditions that need to hold before entering a state. OROCOS states explicitly allow for this. A state’s preconditions will be checked before the state is entered.
Preconditions are specified as follows:
state X {
  // make sure the robot is not moving axis 1 when entering this state
  // and a program is loaded.
  precondition  robot.movingAxis( 1 ) == false
  precondition  programLoaded == true
  // ...
}
They are checked in addition to transitions to that state and can make such a transition fail, hence block the transition, as if the transition condition in the first place did not succeed.
Data Flow Event Transitions
An important property of state machines is that they can react to
external (asynchronous) events. Orocos components can define reactions
to data arriving on RTT::InputPorts. When new data arrives on this
port, we speak of an ‘event’.
Note
A StateMachine can only react to InputPorts which have been added with ‘addEventPort’ to the TaskContext.
Event transitions are an extension to the transitions above and cite an InputPort name between the transition and the if statement. They are specified as:
state X {
  var double d
  transition x_in_port(d) if ( d >1.3 ) then {
     // transition succeeds, transition program:
     // ...
  } select ONE_STATE else {
     // transition fails, failure program:
     // ...
  } select OTHER_STATE

  // other events likewise...
}
Both the transition programs and the the select statements are optional, but at least a program or select statement must be given. The
transition x_in_port(d) if (d >1.3) then {
short notation statement is equivalent to writing (NOTE: the added .read(d) part) :
transition if ( x_in_port.read(d) == NewData && d >1.3) then {...
Important
This short notation differs however from the long form as such: if multiple transitions are waiting on the same port, but with a different guard, the short notation will give all transitions a chance to see the NewData return value. If a user would use the long form, only the first transition statement would see NewData, all the others would see OldData as return value. In this case, the short notation is prefered.
When the input port x_in_port receives NewData, our state machine
reacts to it and the data is stored in d. The if ... then statement
may check this variable and any other state variables and methods to
evaluate the transition. If it succeeds, an optional transition program
may be given and a target state selected (ONE_STATE). if the
transition fails, an optional failure program may be given and an
optional select (OTHER_STATE) statement may be given. The number of
arguments must match the number of arguments of the used event. The
event is processed as an asynchronous callback, thus in the thread or
task of the StateMachine’s processor.
Event transitions are enabled after the entry program and before the exit program (also in automatic mode). All events are processed in a state until the first event that leads to a valid state transition. In the mean time, the run or handle program may continue, but will be interrupted in a yield statement if an event leads to a transition. Run or handle programs without yield will be allowed to finish normally, before the transition is taken.
Reacting to level events on Ports
Another pattern of using ports to handle events, is to implement level events instead of edge events as seen above. The syntax for level events shows that the port must be read out in the if statement, as a normal port read:
transition if (robotState.read(robot_state) != NoData && Robot.STATE_SAFE == robot_state) select SAFE;
The example above shows reading a robotState port and storing the result in the robot_state variable. The transition then checks if the robot_state variable is equal to the defined STATE_SAFE constant in the Robot peer component.
Operation Event Transitions
A second source of transitions are the invocation of Operations of the TaskContext the state machine runs in. In order to respond in a state machine to such an event, the operation needs to be added with the addEventOperation function:
// member variable of 'MyComp':
Operation<void(int)> requestSafe; // don't forget to initialize with a "name" in the constructor.

// ...

   // for example: in the TaskContext constructor:
   this->provides()->addEventOperation(requestSafe).doc("This operation does nothing except for requesting the SAFE state");
Note
A StateMachine can only react to Operations which have been added with ‘addEventOperation’ to the TaskContext.
Note
A StateMachine can only react to Operations of the component it runs in.
Reacting to an Operation call is similar to responding to port events above:
state X {
  var int reason;

  transition requestSafe(reason) if ( reason == 3 ) then {
     // transition succeeds, transition program:
     // ...
  } select SAFE else {
     // transition fails, failure program:
     // ...
  } select OTHER_STATE

  // other events likewise...
}
As with Event ports, both the transition programs and the the select statements are optional, but at least a program or select statement must be given.
Instantiating Machines: SubMachines and RootMachines
As mentioned before: you can look at a SubMachine definition as the definition of a C++ class. It is merely the template for its instantiations, and you have to instantiate it to actually be able to do anything with it. There is also a mechanism for passing parameter values to the StateMachines on instantiation.
Note that you always need to write the instantiation after the definition of the StateMachine you’re instantiating.
Root Machines
A Root Machine is a normal instantiation of a StateMachine, one that does not depend on a parent StateMachine ( see below ). They are defined as follows:
StateMachine SomeStateMachine
{
    initial state initState
    {
      // ...
    }
    final state finalState
    {
      // ...
    }
}

RootMachine SomeStateMachine someSMinstance
This makes an instantiation of the StateMachine type SomeStateMachine by the name of ‘someSMinstance’, which can then be accessed from other scripts (by that name).
Parameters and public variables
StateMachine public variables
You can define variables at the StateMachine level. These variables are then accessible to the StateMachine methods (entry, handle, exit), the preconditions, the transitions and ( in the case of a SubMachine, see below ) the parent Machine.
You can define a StateMachine public variable as follows:
StateMachine SomeStateMachine
{
  // a public constant
  const double pi = 3.1415926535897
  var int counter = 0

  initial state initState
  {
  handle
  {
          // change the value of counter...
          counter = counter + 1
      }
      // ...
  }
  final state finalState
  {
  entry
      {
          someTask.doSomethingWithThisCounter( counter )
      }
      // ...
  }
}

Rootmachine SomeStateMachine mymachine
This example creates some handy public variables in the StateMachine SomeStateMachine, and uses them throughout the state machine. They can also be read and modified from other tasks or programs :
var int readcounter = 0
readcounter = taskname.mymachine.counter

taskname.mymachine.counter = taskname.mymachine.counter *  2
StateMachine parameters
A StateMachine can have parameters that need to be set on its instantiation. Here’s an example:
StateMachine AxisController
{
    // a parameter specifying which axis this Controller controls
    param int axisNumber
    initial state init
    {
        entry
        {
            var double power = someTask.getPowerForAxis( axisNumber )
      // do something with it...
        }
    }
}

RootMachine AxisController axiscontroller1( axisNumber = 1 )
RootMachine AxisController axiscontroller2( axisNumber = 2 )
RootMachine AxisController axiscontroller3( axisNumber = 3 )
RootMachine AxisController axiscontroller4( axisNumber = 4 )
RootMachine AxisController axiscontroller5( axisNumber = 5 )
RootMachine AxisController axiscontroller6( axisNumber = 6 )
This example creates an AxisController StateMachine with one integer parameter called axisNumber. When the StateMachine is instantiated, values for all of the parameters need to be given in the form “oneParamName= ‘some value’, anotherParamName = 0, yetAnotherParamName=some_other_expression + 5”. Values need to be provided for all the parameters of the StateMachine. As you see, a StateMachine can of course be instantiated multiple times with different parameter values.
Building Hierarchies : SubMachines
A SubMachine is a StateMachine that is instantiated within another StateMachine ( which we’ll call the parent StateMachine ). The parent StateMachine is owner of its child, and can decide when it needs to be started and stopped, by invoking the respective methods on its child.
Instantiating SubMachines
An instantiation of a SubMachine is written as follows:
StateMachine ChildStateMachine
{
    initial state initState
    {
        // ...
    }
    final state finalState
    {
        // ...
    }
}

StateMachine ParentStateMachine
{
    SubMachine ChildStateMachine child1
    SubMachine ChildStateMachine child2
    initial state initState
    {
  entry
        {
        // enter initial state :
      child1.activate()
      child2.activate()
        }
        exit
        {
        // enter final state :
            child2.stop()
        }
    }

    final state finalState
    {
        entry
        {
        // enter final state :
            child1.stop()
        }
    }
}
Here you see a ParentStateMachine which has two ChildStateMachines. One of them is started in the initial state’s entry method and stopped in its exit method. The other one is started in the initial state’s entry method and stopped in the final state’s entry method.
SubMachine manipulating
In addition to starting and stopping a SubMachine, a parent StateMachine can also inspect its public variables, change its parameters, and check what state it is in…
Inspecting StateMachine public variables is simply done using the syntax “someSubMachineInstName.someValue”, just as you would do if someSubMachineInstName were an OROCOS task. Like this, you can inspect all of a subcontext’s public variables.
Setting a StateMachine parameter must be done at its instantiation. However, you can still change the values of the parameters afterwards. The syntax is: “set someSubMachine.someParam = someExpression”. Here’s an elaborate example:
StateMachine ChildStateMachine
{
    param int someValue
    const double pi = 3.1415926535897
    initial state initState
    {
        // ...
    }
    final state finalState
    {
        // ...
    }
}

StateMachine ParentStateMachine
{
    SubMachine ChildStateMachine child1( someValue = 0 )
    SubMachine ChildStateMachine child2( someValue = 0 )

    var int counter = 0
    initial state initState
    {
    entry
        {
        child1.start()
        child2.start()
            // set the subcontext's parameter
            child1.someValue = 2
        }
        run
        {
            counter = counter + 1
            // set the subcontext's parameters
            child2.someValue = counter
            // use the subcontext's public variables
            someTask.doSomethingCool( child1.someValue )
        }
        exit
        {
            child2.stop()
        }
    }

    final state finalState
    {
        entry
        {
            child1.stop()
        }
    }
}
You can also query if a child State Machine is in a certain state. The syntax looks like:
someSubMachine.inState( "someStateName" )
Starting and Stopping StateMachines from scripts
Once a state machine is parsed and loaded into the State Machine Processor, it can be manipulated from another script. This can be done through the “states” subtask of the TaskContext in which the state machine was loaded. Assume that you loaded “machine” with subcontexts “axisx” and “axisy” in task “ATask”, you can write
ATask.machine.activate()
ATask.machine.axisx.activate()
// now in reactive mode...

ATask.machine.axisx.start()
ATask.machine.start()
// now in automatic mode...

ATask.machine.stop()
// again in reactive mode, in final state

ATask.machine.reset()
ATask.machine.deactivate()
// deactivated.
// etc.
The first line activates a root StateMachine, thus it enters the initial state and is put in reactive mode , the next line actives its child, the next starts its child, then we start the parent, which bring both in automatic mode. Then the parent is stopped again, reset back to its initial state and finally deactivated.
Thus both RootMachines and SubMachines can be controlled. Some basic properties of the states can be inspected likewise :
var bool res =  ATask.machine.isActive()      // Active ?
res = ATask.machine.axisy.isRunning()     // Running ?
res =  ATask.machine.isReactive()          // Waiting for requests or events?
var string current = ATask.machine.getState() // Get current state
res = ATask.machine.inState( current )    // inState ?
which makes it possible to monitor state machines from other scripts or an operator console.
On Reactive Mode Commands
Consider the following StateMachine :
StateMachine X {
   // ...
   initial state y {
      entry {
     // ...
      }
     // guard this transition.
     transition if checkSomeCondition() then
            select z
     transition if checkOtherCondition() then
            select exit
   }
   state z {
     // ...
     // always good to go to state :
     transition select ok_1
    select ok_1
   }
   state ok_1 {
     // ...
   }
   final state exit {
     // ...
   }
}

RootMachine X x
A program interacting with this StateMachine can look like this :
program interact {
    // First activate x :
    x.activate()  // activate and wait.

    // Request a state transition :
    try x.requestState("z") catch {
        // failed !
    }

    // ok we are in "z" now, try to make a valid transition :
    x.step()

    // enter pause mode :
    x.pause()
    // Different ! Executes a single program statement :
    x.step()

    // unpause, by re-entering reactive Mode :
    x.reactive()

    // we are in ok_1 now, again waiting...
    x.stop()      // go to the final state

    // we are in "exit" now
    reset()

    // back in state "y", handle current state :
    this.x.requestState( this.x.getState() )
    // etc.
 }
The requestState command will fail if the transition is not possible ( for example, the state machine is not in state y, or checkSomeCondition() was not true ), otherwise, the state machine will make the transition and the command succeeds and completes when the z state is fully entered (it’s init program completed).
The next command, step(), lets the state machine decide which state to enter, and since a transition to state “ok_1” is unconditionally, the “ok_1” state is entered. The stop() command brings the State Machine to the final state (“exit”), while the reset command sends it to the initial state (“y”). These transitions do not need to be specified explicitly, they are always available.
The last command, is a bit cumbersome request to execute the handle program of the current state.
At any time, the State Machine can be paused using pause(). The step() command changes to execute a single program statement or transition evaluation, instead of a full state transition.
All these methods can of course also be called from parent to child State Machine, or across tasks.
Automatic Mode Commands
Consider the following StateMachine, as in the previous section :
StateMachine X {
   // ...
   initial state y {
      entry {
     // ...
      }
      // guard this transition.
      transition if checkSomeCondition() then
            select z
      transition if checkOtherCondition() then
            select exit
   }
   state z {
     // ...
     // always good to go to state :
     transition select ok_1
   }
   state ok_1 {
     // ...
   }
   final state exit {
     // ...
   }
}

RootMachine X x
A program interacting with this StateMachine can look like this :
program interact {
    // First activate x :
    x.activate()  // activate and wait.

    // Enter automatic mode :
    x.start()

    // pause program execution :
    x.pause()

    // execute a single statement :
    x.step()

    // resume automatic mode again :
    x.start()

    // stop, enter final state, in request mode again.
    x.stop()

    // etc...
 }
After the State Machine is activated, it is started, which lets the State Machine enter automatic mode. If checkSomeCondition() evaluates to true, the State Machine will make the transition to state “z” without user intervention, if checkOtherCondition() evaluates to true, the “exit” state will be entered.
When running, the State Machine can be paused at any time using pause(), and a single program statement ( a single line ) or single transition evaluation can be executed with calling step(). Automatic mode can be resumed by calling start() again.
To enter the reactive mode when the State Machine is in automatic mode, one can call the reactive() command, which will finish the program or transition the State Machine is making and will complete if the State Machine is ready for requests.
All these methods can of course also be called from parent to child State Machine, or across tasks.
Program and State Example
This sections shows the listings of an Orocos State Description and an Orocos Program Script. They are fictitious examples (but with valid syntax) which may differ from actual available tasks. The example tries to exploit most common functions.
The Example below shows a state machine for controlling 6 axes.
StateMachine Simple_nAxes_Test
{

  var bool calibrate_offsets     = true
  var bool move_to               = true
  var bool stop                  = true

  const double pi = 3.14159265358979
  var array pos = array(6,0.0)


  initial state StartRobotState {
    entry {
      Robot.prepareForUse()
    }
    exit {
      Robot.unlockAllAxes()
      Robot.startAllAxes()
    }
    transitions {
      select CalibrateOffsetsState
    }
  }


  state CalibrateOffsetsState {
    preconditions {
      if (calibrate_offsets == false) then
        select MoveToState
    }
    entry {
      nAxesGeneratorPos.start()
      nAxesControllerPos.start()
      //Reporter.start()
      CalibrateOffsetsProg.start()
    }
    exit {
      nAxesGeneratorPos.stop()
      nAxesControllerPos.stop()
    }
    transitions {
       if !CalibrateOffsetsProg.isRunning then
       select MoveToState
    }
  }


  state MoveToState {
    preconditions {
      if (move_to == false) then
        select StopRobotState
    }
    entry {
      nAxesGeneratorPos.start()
      nAxesControllerPosVel.start()
      pos = array(6,0.0)
      nAxesGeneratorPos.moveTo(pos,0.0)
      pos[0]=-pi/2.0
      pos[1]=-pi/2.0
      pos[2]=pi/2.0
      pos[4]=-pi/2.0
      nAxesGeneratorPos.moveTo(pos,0.0)
    }
    exit {
       nAxesControllerPosVel.stop()
       nAxesGeneratorPos.stop()
       //Reporter.stop()
    }
    transitions {
      if(stop == true) then
      select StopRobotState
    }
  }


  final state StopRobotState {
    entry {
      Robot.stopAllAxes()
      Robot.lockAllAxes()
    }
    exit {
      Robot.prepareForShutdown()
    }
  }
}
RootMachine Simple_nAxes_Test SimpleMoveTo
Below is a program script example.
/**
 * This program is executed in the exec_state.
 */

/**
 * Request the HMI to load the user selected
 * trajectory into the kernel.
 */
export function HMILoadTrajectory() {
  // request a 'push' of the next
  // trajectory :
  HMI.requestTrajectory()
  // when the HMI is done :
  Generator.loadTrajectory()
}

/**
 * a Homing (reset) of the axes.
 * This could also be done using a Homing state,
 * without a program.
 */
export function ResetAxes() {
  HomingGenerator.start()
  HomingGenerator.homeAll()
}

export function ResetAxis(int nr) {
  HomingGenerator.start()
  HomingGenerator.homeAxis( nr )
}

/**
 * Request the Generator to use the current
 * trajectory.
 */
function runTrajectory() {
  Generator.startTrajectory()
  // this function returns when the
  // trajectory is done.
}

program DemoRun {
  HMI.display("Program Started\n")
  var int cycle = 0

  // We actually wait here until a
  // Trajectory is present in the HMI.
  while ( !HMI.trajectoryPresent() )
     yield;

  while HMI.cycle() {
      HMI.display("Cycle nr: %d.\n", cycle )
      ResetAxes()
      HMIRequestTrajectory()
      runTrajectory()

      Timer.sleep( 5.0 ) // wait 5s
  }

  HMI.display("Program Ended\n")
}
Comments
Various sorts of comments are supported in the syntax. Here is a small listing showing the various syntaxes:
Whitespace is in general ignored, except for the fact that it is used to separate tokens.